...
The coapi part is used to signify that it is a content type, and the farImageGallery is the name of the content type (the name of the file, farImageGallery.cfc). The next part properites is a constant to allow access to the content types properties and must be typed exactly as is: properties. The title in the example is the property name (as defined by the name attribute on the cfproperty). The final part of the path statement is the value of the ftLabel preceded with an @ symbol. It is important to note that this is the value of the ftLabel not the term ftLabel. It is also important to note that the [ and ] characters are escaped. If you do not use those charaters in the ftLabel value, then it is simply the value by it self (... title@Title=... for example).
Refreshing Locale
...
Changes
If you make changes to any of the locale files, you will need to reload the application to see the changes. The easiest way to to a reload is to log into the webtop, and click on the Admin tab. From there select the Developer Utilities from the drop down on the left.
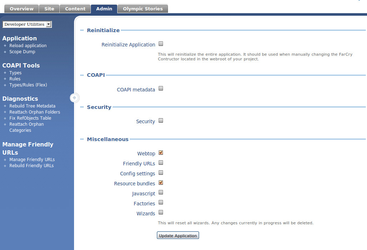
You should be looking at Reinitialise screen. From that screen you can tick the webtop and resource bundles check boxes, and then click Update Application. See screen grab below.
Switching Locales for Testing
As mentioned above, to create a new locale translation you'll need to create a file called admin_xx_YY.properties where xx_YY is the locale specification. However, once you create this file, you'll need to activate the locale to see the translation for the new locale. For the following example, we will use simplified Chinese - the locale for simplified Chinese is zh_CN.
1) Create a file named admin_zh_CN.properites in your packages/resources directory. This directory can be in a plugin or in your project depending for which you are providing translations.
This step is harder than it first appears because the underlying libraries FarCry uses are based on the i18n libraries for Java. Sadly, this means that the files must be encoded in iso-8859-1 which mean complex encodings like Chinese must use the Unicode translated equivalents.
For example, instead of typing things like "题目" in the file you need to type "\u9898\u76EE". Translating using Unicode escapes by hand is very tedious and time consuming. Luckly, since FarCry uses the resource bundle standards, however, tools are availiable to make translation much easier. Once such tool is the resource bundle editor for Eclipse: http://sourceforge.net/projects/eclipse-rbe/ See the screen grab below
| Note |
|---|
Download and use a 3rd party tool to do translations. Any Java resource bundle editor will work. I tend to use the Eclipse plugin http://sourceforge.net/projects/eclipse-rbe/ |

2) Add the locale so it can be chosen. Edit the file farcryConstructor.cfm in your project, and add the locale to the THIS.locales variable. For example, this:
| Code Block |
|---|
<cfset THIS.locales = "en_AU,en_US" />
|
becomes this
| Code Block |
|---|
<cfset THIS.locales = "en_AU,en_US,zh_CN" />
|
3) Update the application. Use the webtop admin tool to update the entire application (See "Refreshing Locale Changes" above)
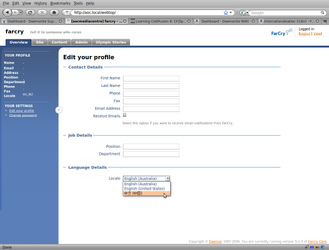
4) Edit the profile of account in which you are logged in, and set the locale to your new locale. You can do this from the profile screen (see screen grab below)
After your locale is switched the labels you have defined in the local properties file should then be in use. As seen in the following screen shot. Note, not all labels have been translated (and the ones that have are somewhat bad), but it conveys the point.